
The sensorial aspect of Montessori learning is one of the main reasons parents choose this education method for their children. Some of Montessori's sensorial materials can be a bit difficult to grasp the concept of, though.
The Montessori Geometric Cabinet is one such material that holds such a great purpose but needs some explanation sometimes.
In this article, you will learn what items are in the Geometric Cabinet, what the purpose of these items is, and how to present the activities to a child.
If you are homeschooling in a Montessori way or implementing some Montessori materials in your traditional school, this will be helpful information.
(This post contains affiliate links. Purchasing from these links costs you nothing extra, but helps with our website upkeep.)
What is the Montessor Geometric Cabinet?
The Geometric Cabinet is a Montessori sensorial material that is typically introduced during the first year of primary, between the ages of 3 and 4 years old. It is used throughout the primary years, as well as in the elementary years.
The material consists of a wooden cabinet with 6 drawers, each containing wooden sockets of various shapes and the corresponding knobbed wooden insets.
Typically, the sockets are yellow and the knobbed insets are blue.
The Montessori Geometric Cabinet is a pre-math, pre-writing, and pairing activity.
The purpose of the Geometric Cabinet is to help children develop the visual discrimination of shapes. This is an important skill, as visual discrimination is used in many aspects of life and learning, including reading.
During the Geometric Cabinet activities, the child uses their fingers to trace the edges of the insets. This helps prepare them for using a pencil to make the shapes that form letters.
Some other benefits of this material include:
- refinement of pincer grasp
- introduction of relevant vocabulary
- increased concentration
- increased control of body movement
With both the Presentation Tray (sometimes called a Demonstration Tray), a 3-period lesson should accompany the presentation, as well as work with the appropriate nomenclature cards.
Through the child's work with the Geometric Cabinet, they prepare for working with other Montessori materials, such as the Form Cards, the Metal Insets, and the Botany Cabinet.

- The geometrical cabinet introduces the child to plane geometry.
- Encourage the child to recognize representation of shapes leading…
- Comparisons and geometrical deductions may be made.
Contents of the Geometric Cabinet
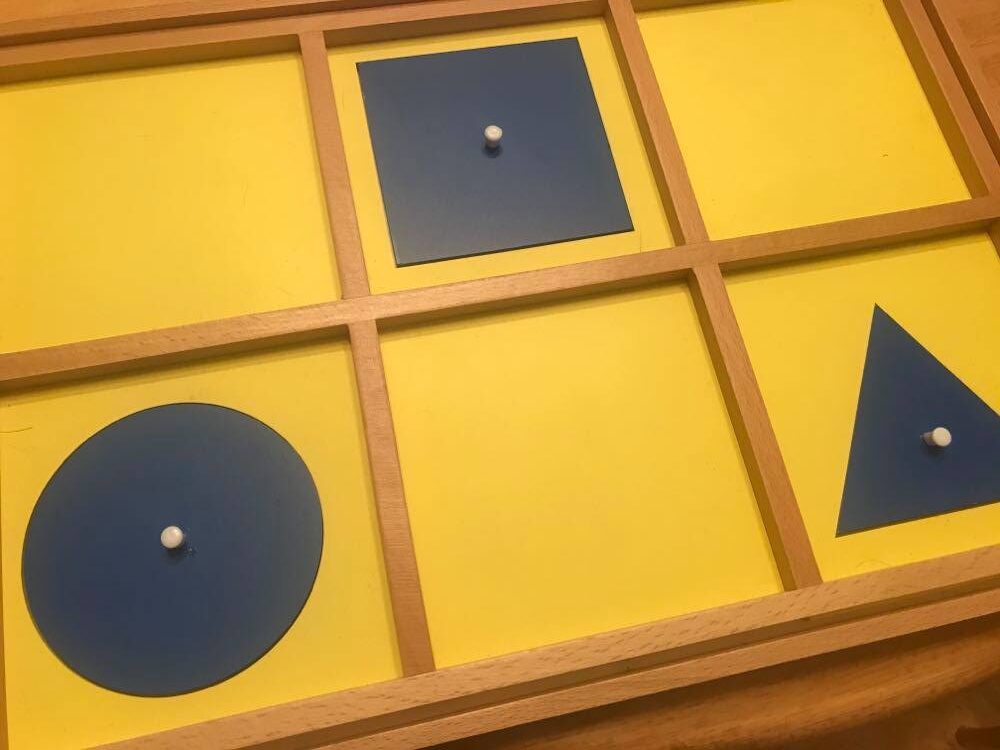
The Geometric Cabinet Demonstration Tray
The Geometric Cabinet Demonstration Tray is not included in the Geometric Cabinet but is typically kept near or on top of it.
It is a tray that includes a circle, triangle, and square.
The purpose of the Demonstration Tray is to introduce the vocabulary and characteristics of the 3 main geometric shapes and is introduced to the child prior to the Geometric Cabinet.
Drawer 1
- 6 circles lessening in diameter between 10cm and 5cm
Drawer 2
- 6 rectangles lessening in width between 10 cm and 5cm
Drawer 3
- 6 types of triangles: obtuse scalene, right scalene, equilateral, right isosceles, acute isosceles, obtuse isosceles
Drawer 4
- decagon, nonagon, octagon, heptagon, hexagon, pentagon
Drawer 5
- elipse, oval, curvlinear triangle, quatrefoil
Drawer 6
- rhombus, parallelogram, right trapezoid, isosceles
How to present the Geometric Cabinet
- Show the child how where to find the drawer they are to work with in the Cabinet and have them carefully carry it to the table.
- Starting with the shape at the top left corner of the drawer, remove each inset from the drawer by its knob and place them randomly on the table below the drawer.
- Lift one inset from the table using a pincer grasp and turn it toward yourself. Then slowly trace the edge in a counter-clockwise direction with the 2 primary fingers of your dominant hand.
- Slowly browse the inset sockets on the drawer, running the inset in your hand over each one, until you find the matching one.
- Using your primary fingers again, slowly trace the edge of the socket and put the inset in.
- Continue this process with the remaining insets.
- When all the insets have been placed in the drawer, take them out again and invite the child to do the activity themselves.
Geometric Cabinet extensions
- nomenclature card exercise
- performing the activity blindfolded – stereognostic activity
- using multiple drawers at a time
- tracing the insets with a pencil
- tracing the sockets with a pencil
The Geometric Cabinet is a simple activity to present and it has so many benefits for children.
This is a great investment for Montessori learning at home, as it is very versatile in its uses and can be paired with other materials, either DIY or store-bought.
Cheers and don't forget to subscribe!
This helped me a bunch in Montessori!!!